Smoking the Bees and opening the hive
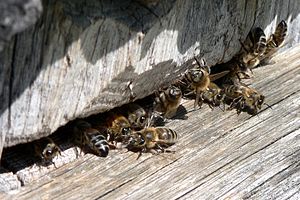
Keep in mind the following. It is highly recommended that you inspect the colonies on warm and sunny days. The reason: the bees will be busy foraging and a large percentage of bees will be away from the hive. Also, keep to the back or the side of the entrance. Staying directly in front of the entrance will on cause the bees to constantly bump into you as they exit and return to the hive. Activity at the front can be as busy as an airport and you should always stay out of the way of this traffic.
Dress as you feel comfortable. If I'm doing major hive rearranging then I'm in long pants, long sleeve shirt and eye protection. But generally speaking, I go in with shorts and a teeshirt, bare-handed and just usingieye protection. Most of you will not approach the hive in this casual clothing and that is understandable. For me though, I use this lack of clothing as a constant reminder that I need to be alert and mindful of all my actions movements around the bees. If I were dressed to the hilt, I'd likely spend less time being careful and and more time being clumbsy and inadvertently hurtful to the hive.
After placing all your tools within reach, light the smoker as described above and send several slow puffs of smoke into the entrance of the hive. Wait a minute and repeat this process. Next remove the outer lid and shoot smoke into the hole of the inner cover. Again wait a minute and bellow smoke into the entrance and inner cover.
Each time should be a solid puff of cool smoke. Make sure that all flames are out inside of the smoker and DO NOT pump too much smoke into the hive. The bees should make an effort to clear the smoke, they noticibly will increase their buzzing for about a minute before calming down. Over smoking can harm the bees and larva and hot smoke can burn them. You need to keep the smoke cool and to a minimal when treating the colony during inspection. Over smoking them will result in harming them and may increase their agressiveness, totally the opposite of what we are trying to achieve.
I like to pry all the boxes loose before I start taking the boxes apart. I place the hive tool into the tight spaces between the boxes and slowly press downward, raising the boxes above just enough to break the seal of propolis that usually patches any air leaks within the colony. I don't lift the boxes so high as to let the bees crawl their way toward the openings, to do so will result in squooshed bees and an instant alert mode in the colony.
Remove the outer lid and inner cover, placing them "Bee Side" away from you, but with in easy reach. You will be looking down into the 10 frames of the top box, but for this lesson we are going directly into the brood box. This is a major concern to the beekeeper and the place that all inspections should start.
Remove any upper honey box or boxes and set them aside. You should now be looking into the heart of the colony, the brood box. Of course in a larger colony there could be several brood boxes. If that is the case, repeat these methods for each of the brood boxes and be sure to return the boxes in the same order that you found them.
Get on in There...
I like to take an end frame out of the hive and set it aside, this gives me room to slid the remaining frames around to easily break the wax that binds them together. I then pull a frame from the center of the brood box and I slowly raise a frame so that it about 1 foot from my face. This is where you are going to pay lots of attention and make several mental notes. Later you need to transcribe your thoughts to print - log keeping is eccential to the servival of your colonies. Trust me, a few lines in a simple logbook now will save you hours of torment later on.
First I look at the general patteren of the brood on this frame. Normal brood patterns from a healthy queen appear oval across the length and heigh of the frame. Noticibly, you shouls see a near perfect oval from top to bottom and side to side with a good combination of sealed pupa, larva of all ages and cells filled with eggs. In each corner of the frame you will see nectar, honey, pollen and water stores - this is perfect text book stuff and immediately I am thinking that the colony is doing fine. I briefly look on both sides of the frame for similar patterns and development and then I go a bit deeper into the cells within the brood pattern.
I want the sun behind me and I want to raise the frame so that the sun shines all the way to the bottom of every cell. Never BREATHE right on to the bees either, they will take off and likely sting you. I am always conscience of my breathing and the roll my physical body is playing. I try to anticipate my next move and slowly move toward it in a mechanical, yet fluid fashion.
I look deep into the cells, looking for eggs which are very tiny and hard for the new beekeeper to spot. But once you get the sun from behind to shine deep into the cell, you should see the tiny "Comma sized ) eggs standing up and well centered in each cell. These eggs actually swell as the get closer to hatching, so day old eggs, which are obviously the smallest will be the toughest to see. But please note that any eggs in these cells will alert you that the queen was alive and laying within the last 5 days. This is great news and even if you DON'T see the queen during this inspection, you can assume that she is alive and somewhere about the hive laying nearly 2000 more eggs this day.
Place your protected eyes about 8 inches OR your minimum focus length and pause to let bees regain their footing and they return to bee work. A good cheapy pair of reading glasses can really help you get in there super close. Slowly move your hands from side to side letting the frame move under your vision and carefully, methodically inspect each cell under your vision. Larva is another great tool to use when inspecting brood frames. Larva of all sizes can be seen on an average brood frame. From remarkably small ( nearly the size of the swollen eggs ) to rediculously big, where they larva almost spills from the cells can be seen. The remaining cells are capped over with a duller golden color and they are filled with pupa, which are only days away from emerging as fully developed bees.
After looking along an entire side, slowly rotate the frame to see the opposite side. The easiest way to turn the frame when using TWO HANDS to hold it is to just flip the bottom over the top, slowly rotate the frame with a flip of BOTH wrists. Again, let the bees get use to being upside down before you move in close, the bees on this side of the frame haven't seen you yet. Always, smooth and purposeful movements.
Approaching the hive
As you approach the hive, slowly move in with your arms in front of you. You want the bees to see your arms as early as possible. No need the all of a sudden being scared by flaring arms. Squat down to the side of the hives entrance, about 3 feet away. Never stand in front of the hive blocking the entrance during your inspect. I prefer the rear but that is not always possible.
I stand about 10 feet from the hive and watch the bees coming and going. I use a simple formula that a friend taught me, I count the bees coming and going for ONE minute. He said multiply the number times 1000 and you will have a rough idea of the total bee count.
I stand there looking at the hive, focusing at the entrance, almost zooming with my eyes and studying the traffic.
I slowly walk toward the hive, looking out my glasses as if they were a camera lens and my body is the camera dolly, panning and moving as smoothly as a helicopter choreographed to a fine work of mozart. If you think of this as a movie that you are watching and interacting with, the sooner you will become seamless with experience.
Look for pollen on the legs of the returning workers. Colored sacs of bright orange, yellow and red. Look for dead bees at the entrance and dead bees on the ground. Look for normal hive activity, if something appears out of place, remember it for your log.
Lift off the inner cover and slowly place it on top of the stacked empty supers. Shifting your weight, studying the way weight and balance move through your body and be as fluid as possible. You are doing a ballet of sorts. Again, make up your mind WHERE you are going to put something before you remove it. Keep your thoughts, one step ahead of your hands and remove as much lifting and carrying as possible.
Either by using your hands or by using the frame grabber, pull a few frames from the upper box, which should be honey storage only, egg cells will be in the lower box. I mentioned earlier that we are using a queen excluder which is used to keep the queen in the lower box. This is a real handy device for easily maintaining a colony and I recommend a queen excluder.
Pull several frames out, checking to see how much honey your hive has. This of course varies with seasonal changes, how much you've collected for your own use. You can also use a bathroom scale for measuring how much honey you have. Set a brick on the scale and use a hive box sized 3/4" plywood sheet. Place them on the scale, readjust it to zero, then place the super on top of the plywood and log the weight. Otherwise, just mentally. Note: that a full frame is about 12 pounds.
Again look at this side of the frame as you did with the first side. Look at several key frames in the honey box and look at many of the frames in the EGG LAYING bottom super. The queen excluder is marvelous in keeping your queen ( thus eggs, larva and pupa ) in the lower box. Keeping ALL honey in the upper box. I really recommend a good queen excluder.
EGG LAYING ( Brood ) Super
Once you have looked at and returned the honey frames back to the super, place it aside and get ready to inspect the Brood Chamber. This is the most interesting part of beekeeping. Let me try to explain the things you need to do in detail.
At hands length look at the frame and you should see an OVAL PATTERN in the middle of the frame where the queen laid eggs. You will see in that oval space covered cells, larva and if you look DEEP into the cell, you will see the tiny eggs, hanging at the bottom of the cell. It is about the size of a COMMA. You should see lots of each in a good healthy hive.
Look and mentally note how many drones are on the frame. Drones are fat, happy and STINGLESS male bees and should be in relatively SMALL NUMBERS in the hive. Only a few hundred at best in the entire hive.
I suggest you have your queens marked. I don't mark my swarm queens, but I do my surviving queens after a Wintering. I do though plan to mark future queens JUST to make my photography a bit more enjoyable.
It's NOT unusual to NOT see the queen during your inspection. If you do it's always fun to watch her march around. I often see the queen inspecting the empty cell and then dip her abdomen into the cell and lay an egg there. If you don't see her, just make sure you DID see eggs or larva. If you do, the queen was alive just a few days ago and is probably fine.
Source: www.beemaster.com
Monday, November 27, 2006
Bee Propolis
The term "propolis" comes from two Greek words: "pro," which means "before," and "polis," which means "city." This ancient term came into being centuries ago when some early Greek student of Nature established the fact that honeybees use propolis to narrow the opening into their "cities," or hives, to keep out unwelcomed intruders. Many sources attribute the word to Aristotle (384-322 B.C.)
What is Propolis ?
Propolis is a sticky resin that seeps from the buds of some trees and oozes from the bark of other trees, chiefly conifers.
The bees gather propolis, sometimes called bee glue, and carry it home in their pollen baskets. They blend it with wax flakes secreted from special glands on their abdomens.
Propolis is used to slickly line the interior of brood cells in preparation for the queen's laying of eggs, a most important procedure. With its antiseptic properties, this propolis lining insures a hospital-clean environment for the rearing of brood.
The Constituents of Propolis
Chemically speaking, propolis is a very complex mixture. Its chemical elements vary according to its source. Colors range from golden brown to brownish green to reddish brown to blackish brown. A broad analysis reveals approximately 55 percent resinous compounds and balsam, 30 percent beeswax, 10 percent ethereal and aromatic oils, and 5 percent bee pollen. Many flavonols contribute to propolis. Other components include cinnamic acid, cinnamyl alcohol, vanillin, caffeic acid, tetochrysin, isalpinin, pinocembrin, chrysin, galangin, and ferulic acid.
The Properties of Propolis
Propolis is another medicinal marvel from the beehive. Research shows it offers antiseptic, antibiotic, antibacterial, antifungal, and even antiviral properties. Propolis is Nature's premiere preventive. It is so powerful in action, it is often called Russian penicillin in acknowledgement of the extensive research the Russians have mounted on this wonder worker from the bees. Propolis demonstrates strong antimicrobial properties against various bacterial and fungal infestations. Even streptococcus bacteria have been shown sensitive to propolis.
Natures's Preventive Medicine
Propolis has been justly called Nature's premier preventive. The immune system is supported and strengthened by the ingestion of propolis. Modern scientific studies indicate that those who take propolis regularly escape winter colds and sore throats and seem to develop a natural immunity to common viruses, including the various strains of flu.
Chemical antibiotics destroy all bacteria in the body, both the friendly, (necessary flora required for healthy functioning in the entire gastrointestinal tract) and the bad intestinal flora. An individual who constantly takes prescribed antibiotics for one condition after another soon learns to his sorrow that the drugs may no longer work as well as they once did. As invading bacteria get "smarter," the drugs become less and less effective.
Propolis, the natural antibiotic, works against harmful bacteria without destroying the friendly bacteria the body needs. Propolis has also been proven effective against strains of bacteria that resist chemical antibiotics.
The field of influence of propolis is extremely broad. It includes cancer, infection of the urinary tract, swelling of the throat, gout, open wounds, sinus congestion, colds, influenza, bronchitis, gastritis, diseases of the ears, periodontal disease, intestinal infections, ulcers, eczema eruptions, pneumonia, arthritis, lung disease, stomach virus, headaches, Parkinson's disease, bile infections, sclerosis, circulation deficiencies, warts, conjunctivitis, and hoarseness.
Propolis helps regulate hormones and is an antibiotic substance that stimulates the natural resistance of the body. Propolis may be used by everyone, sick or healthy, as a means of protection against microorganisms. Propolis is also efficient against conditions caused by bacteria, viruses, or different fungi. Propolis cures many diseases because it is a special natural substance with strong effect.
Use it as part of your daily program of supplementation. It has helped the bee society survive and thrive for over 45 million years. It may well help you survive ... for a long time!
Source: www.draperbee.com
Installing the Bees.
A quick look at installing honeybees from packages


This example uses hives which have been split from other hives - they have frames with drawn comb and some honey also, but the installation is the same if you have frames with only foundation. I set up the top supers, which are half filled with honey on my side walk, placed the removed frames from the bottom supers and the packaged bees their while I readied the bottom boards and brood supers. I used the smoker to get them a bit better in the mood for the installation.


I brought over a shipping cage and took off the top board holding the feeder can and queen cage off. I carefully took out the queen cage, inspected it to see she was fine and removed the small cork that would prevent the workers from chewing their way into the queen cage to get her out too soon.


I temporarily covered the entrance where the queen cage was pulled out from the shipping cage and placed the queen into the comb-less foundation - due to the ridiculous metal strapping used to attach the queen cage to the frame - I prefer nylon straps that allow you to further drop the queen cage further into the hive that at the very to as shown in the photo.


I removed the side and bottom wood rails that held the cage screen in place, rolled the screen upwards out of the way and banged the shipping cage DISLODGING most of the bees in one good plop into the hive through the few frames I had removed. I shook out any remaining bees easily without having to force them through the small feeder can hole. This keeps the bees very calm and they will go right to work.


I replaced the frames into the hive and returned the second story high super into place. As you probably noticed, I skipped a few steps from C1 to C2, since the steps are identical for each installation and the final product is hives ready for action. This whole process can take only minutes if you are prepared. And just as quick the bees will be off doing orientation flights.


Finally, I placed the two feeder cans filled with syrup over to the hive entrance feeders until I got a chance to open these cans, mix it's content with my sugar-water mixture and place glass gars where the tin cans are located in the photo below. The final photo - taken early during the install shows EXACTLY how close to my neighbors property line is.


This is pretty basic installation and shouldn't take more than a half an hour to do two hives. Ideally, you can do one hive at a time with about a 1 hour break in between.
Source: www.beemaster.com
This example uses hives which have been split from other hives - they have frames with drawn comb and some honey also, but the installation is the same if you have frames with only foundation. I set up the top supers, which are half filled with honey on my side walk, placed the removed frames from the bottom supers and the packaged bees their while I readied the bottom boards and brood supers. I used the smoker to get them a bit better in the mood for the installation.
I brought over a shipping cage and took off the top board holding the feeder can and queen cage off. I carefully took out the queen cage, inspected it to see she was fine and removed the small cork that would prevent the workers from chewing their way into the queen cage to get her out too soon.
I temporarily covered the entrance where the queen cage was pulled out from the shipping cage and placed the queen into the comb-less foundation - due to the ridiculous metal strapping used to attach the queen cage to the frame - I prefer nylon straps that allow you to further drop the queen cage further into the hive that at the very to as shown in the photo.
I removed the side and bottom wood rails that held the cage screen in place, rolled the screen upwards out of the way and banged the shipping cage DISLODGING most of the bees in one good plop into the hive through the few frames I had removed. I shook out any remaining bees easily without having to force them through the small feeder can hole. This keeps the bees very calm and they will go right to work.
I replaced the frames into the hive and returned the second story high super into place. As you probably noticed, I skipped a few steps from C1 to C2, since the steps are identical for each installation and the final product is hives ready for action. This whole process can take only minutes if you are prepared. And just as quick the bees will be off doing orientation flights.
Finally, I placed the two feeder cans filled with syrup over to the hive entrance feeders until I got a chance to open these cans, mix it's content with my sugar-water mixture and place glass gars where the tin cans are located in the photo below. The final photo - taken early during the install shows EXACTLY how close to my neighbors property line is.
This is pretty basic installation and shouldn't take more than a half an hour to do two hives. Ideally, you can do one hive at a time with about a 1 hour break in between.
Source: www.beemaster.com
Thursday, November 16, 2006
History of beekeeping
Beekeeping is one of the oldest forms of food production. Some of the earliest evidence of beekeeping is from rock painting, dating to around 13,000 BC. It was particularly well developed in Egypt and was discussed by the Roman writers Virgil, Gaius Julius Hyginus, Varro, and Columella. A pioneering beekeeping popularizer in the 19th century United States was Amos Root.
Beekeeping was traditionally practiced for the bees' honey harvest, although nowadays crop pollination service can often provide a greater part of a commercial beekeeper's income. Other hive products are pollen, royal jelly, and propolis, which are also used for nutritional and medicinal purposes, and wax which is used in candlemaking, cosmetics, wood polish, and for modelling. The modern use of hive products has changed little since ancient times.
Western honeybees are not native to the Americas. American, Australian, and New Zealand colonists imported honeybees from Europe, partly for honey and partly for their usefulness as pollinators. The first honeybee species imported were likely European dark bees. Later italian bees, carniolan honeybees and caucasian bees were added.
Western honeybees were also brought to the Primorsky Krai in Russia by Ukrainian settlers around 1850s. These Russian honey bees that are similar to the Carniolan bee were imported into the U.S. in 1990. The Russian honeybee has shown to be more resistant to the bee parasites Varroa destructor and Acarapis woodi.
Before the 1980s, most U.S. hobby beekeepers were farmers or relatives of a farmer, lived in rural areas, and kept bees with techniques passed down for generations. The arrival of tracheal mites in the 1980s and varroa mites and small hive beetles in the 1990s led to the discontinuation of the practice by most of these beekeepers as their bees could not survive among these new parasites.
In Asia, other species of Apis exist which are used by local beekeepers for honey and beeswax. Non-Apis species of honeybees, known collectively as stingless bees, have also been kept from antiquity in Australia and Central America, although these traditions are dying, and the trigonine and meliponine species used are endangered.
Source: wikipedia
Subscribe to:
Comments (Atom)